
This hack creates an Aux-like hook-up from the stereo to an iPod, as pictured below.
To download a .pdf version of this guide, right-click here, and Save As.

Introduction
The hack was completed on a 2006 Corolla-S manual shift with a 6-CD Changer (model number: A51814.) The 2006 Corolla doesn’t have an auxiliary hook-up, and the stick physically interferes with a FM Transmitter – which sounds awful, anyway.
This hack was completed with zero knowledge about cars, stereos, or electronics.
References used:
Dante Cardova’s Stereo Removal Guide – no longer available
chrisayad’s Instructable
Matthew Jorgenson’s Ehow
Disclosure: Modifying your car and/or stereo may null/void any warranties, or cause irreparable damage. Working with a device that carries electrical charge may cause bodily harm. Proceed at your own risk; the author assumes no responsibility for any damage to the car, stereo, or yourself in following the guide.
Tools
Flat Head Screwdriver
Phillips Screwdriver
Socket Wrench
Paint Scraper (optional)
Wire Cutters
Headphone extension cable ($9 at Radio Shack – cut female end. Strip three inches to reveal three wires: red, black, and an exposed wire (gray))
Soldering Iron (requires a medium-level of soldering ability)
Solder
Silent CD (optional)
Stereo Removal
-
- Disconnect positive lead from car battery.
Prevents air bags from accidently deploying. Wait three minutes for charge in the capacitor to dissipate. Write down radio pre-sets; they will be lost.
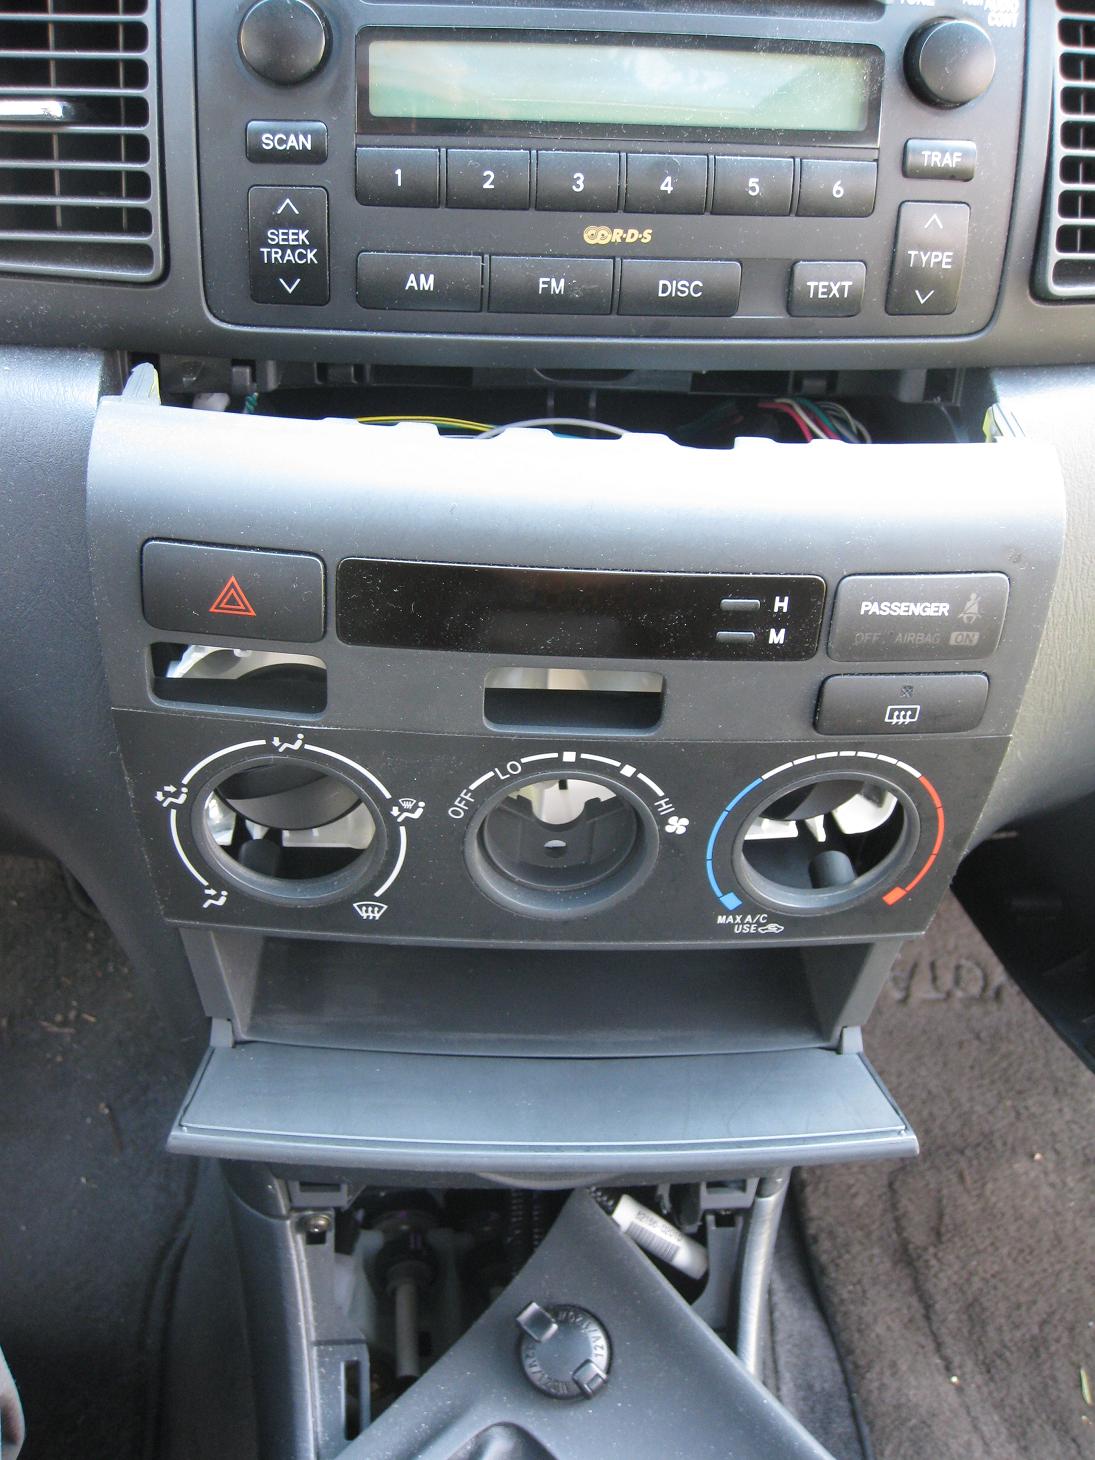
- Pop the base around the shifter.
Wedge paint scraper at the bottom to pop off the base. Turn the base sideways to keep out of the way. - Remove single screw holding the A/C panel.
Pull middle knob of A/C panel straight out. The screw is hidden behind it. - Remove the A/C console.
Four clips, located at the four corners, holding the console in place. Start with the top right corner – reach through the glove compartment and apply pressure from the side to release.
Next, the top left corner – wedge with the paint scraper, or apply pressure from the side. Tugging from the front (hook index finger on the inside of the removed knob) helps.
With the top unclipped, unclip the bottom, one side at a time.
- Disconnect positive lead from car battery.


-
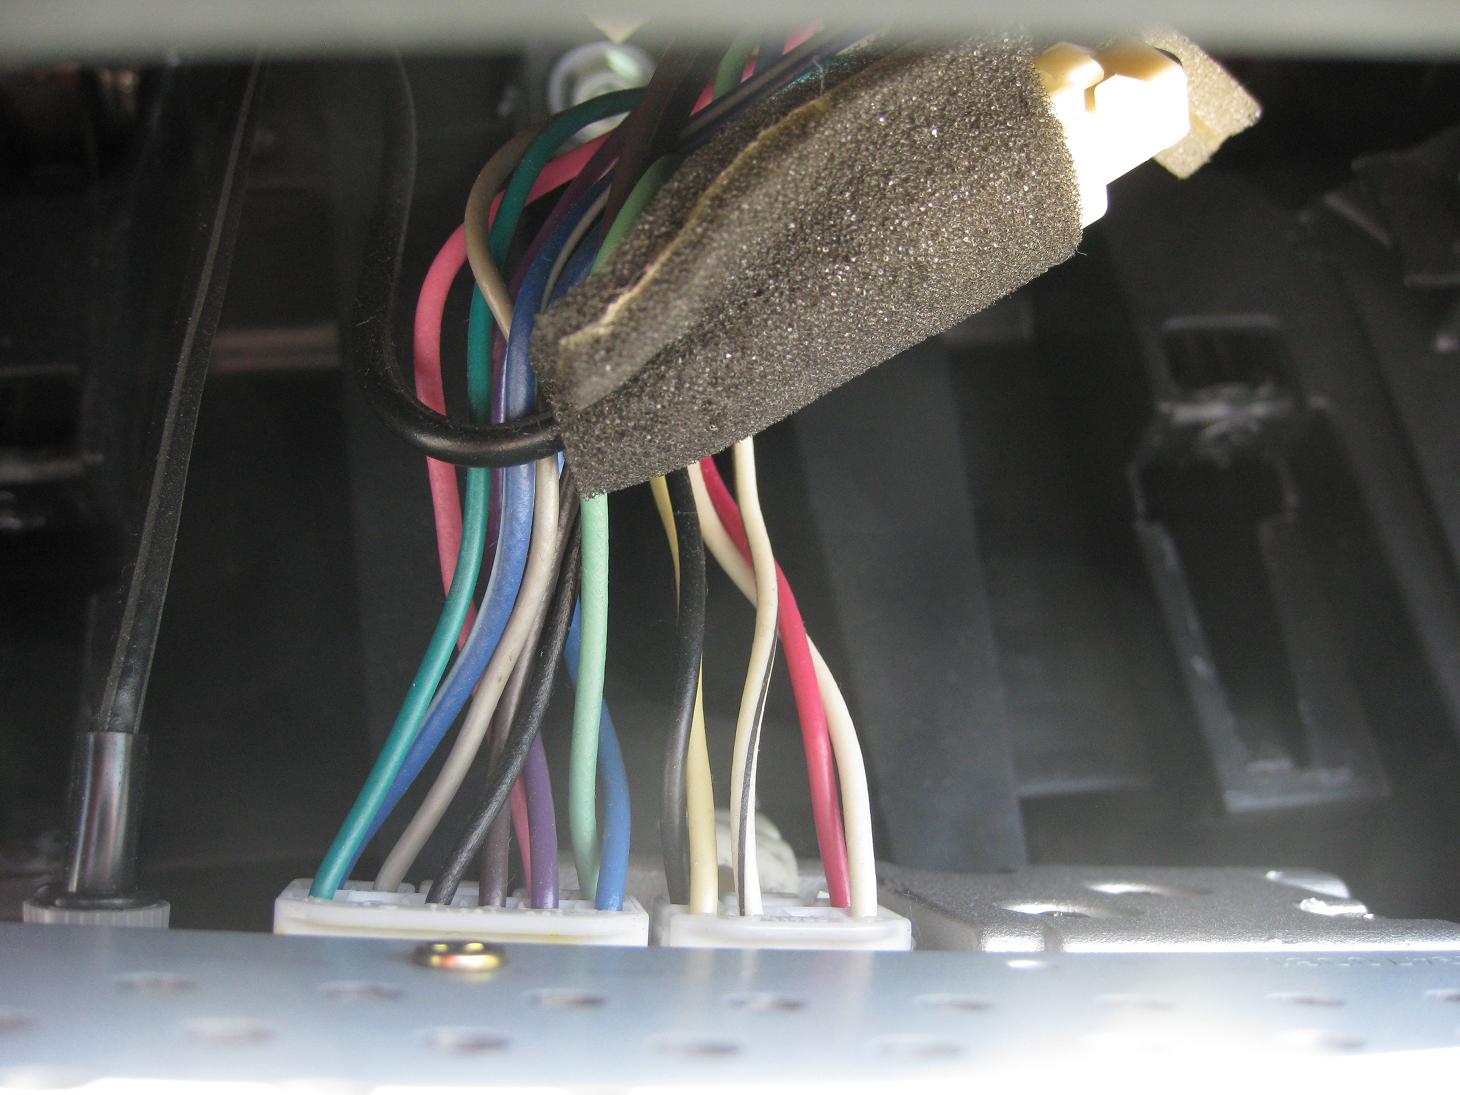
- Disconnect four cables hooked up to the A/C console.
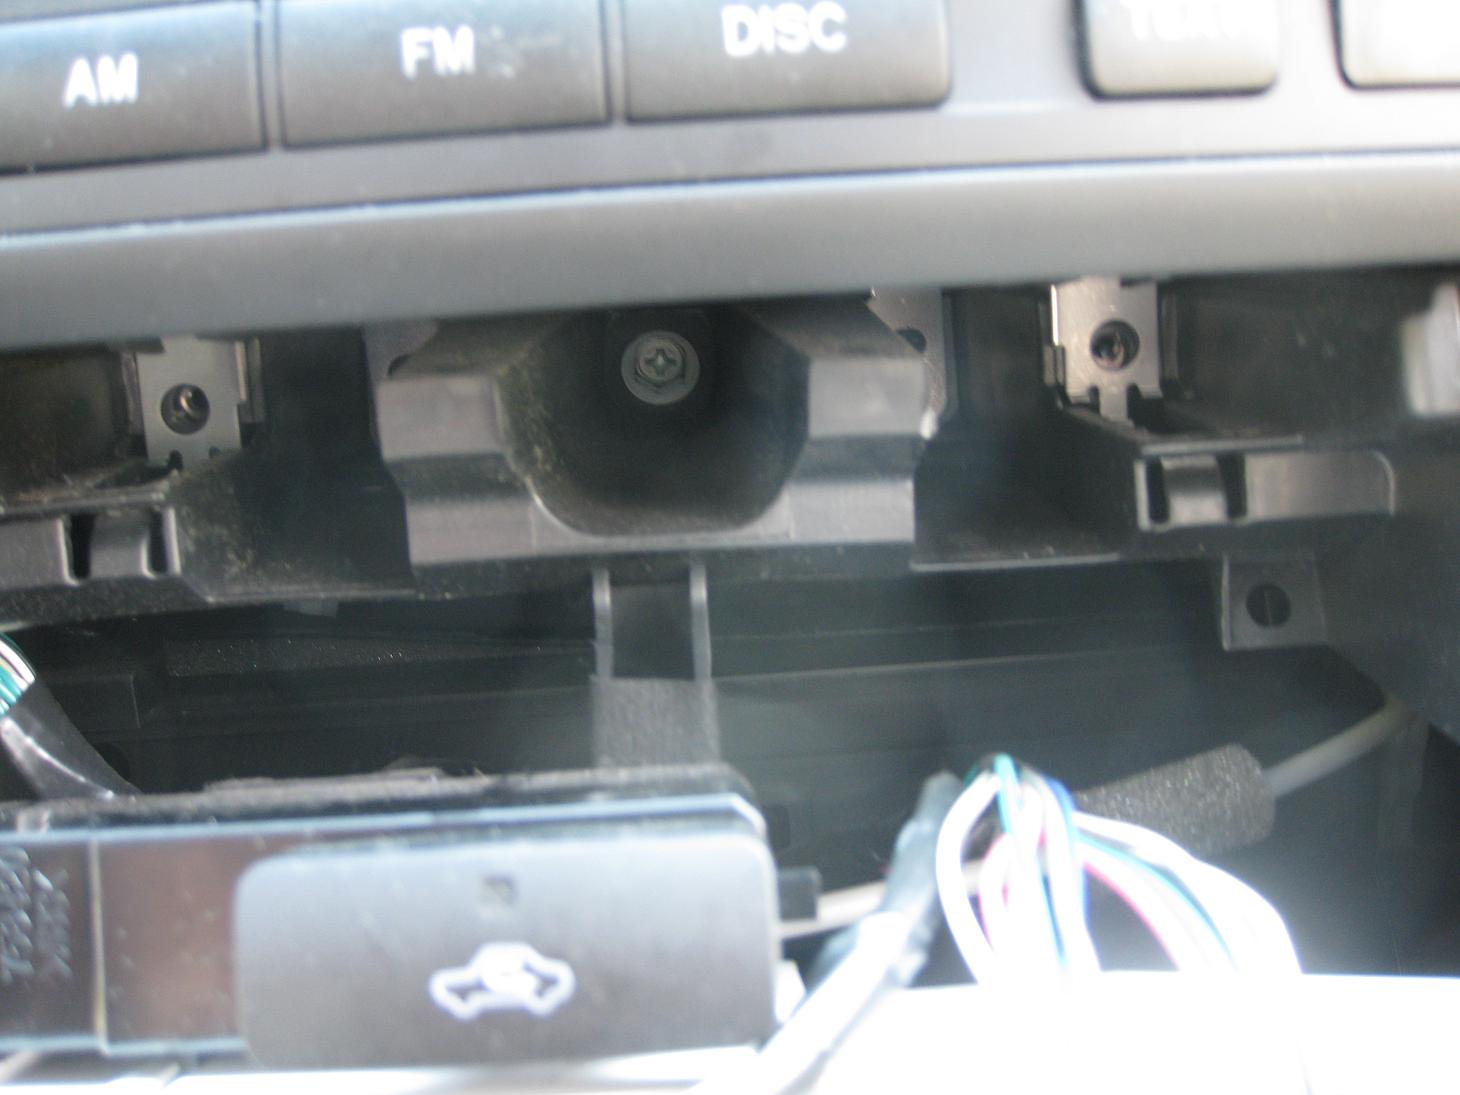
After removing the A/C console, cut a hole in the back of top change compartment with a screwdriver. The headphone extension cable will feed to the iPod at this point. - Unscrew four bolts below the stereo.
Use the long socket wrench, preferably with a magnetized tip. Dropping the bolt will send it tumbling down into the wiry dashboard. There’s a middle screw that does not need to come out. - Pull out the stereo, which will come out with the vent assembly.
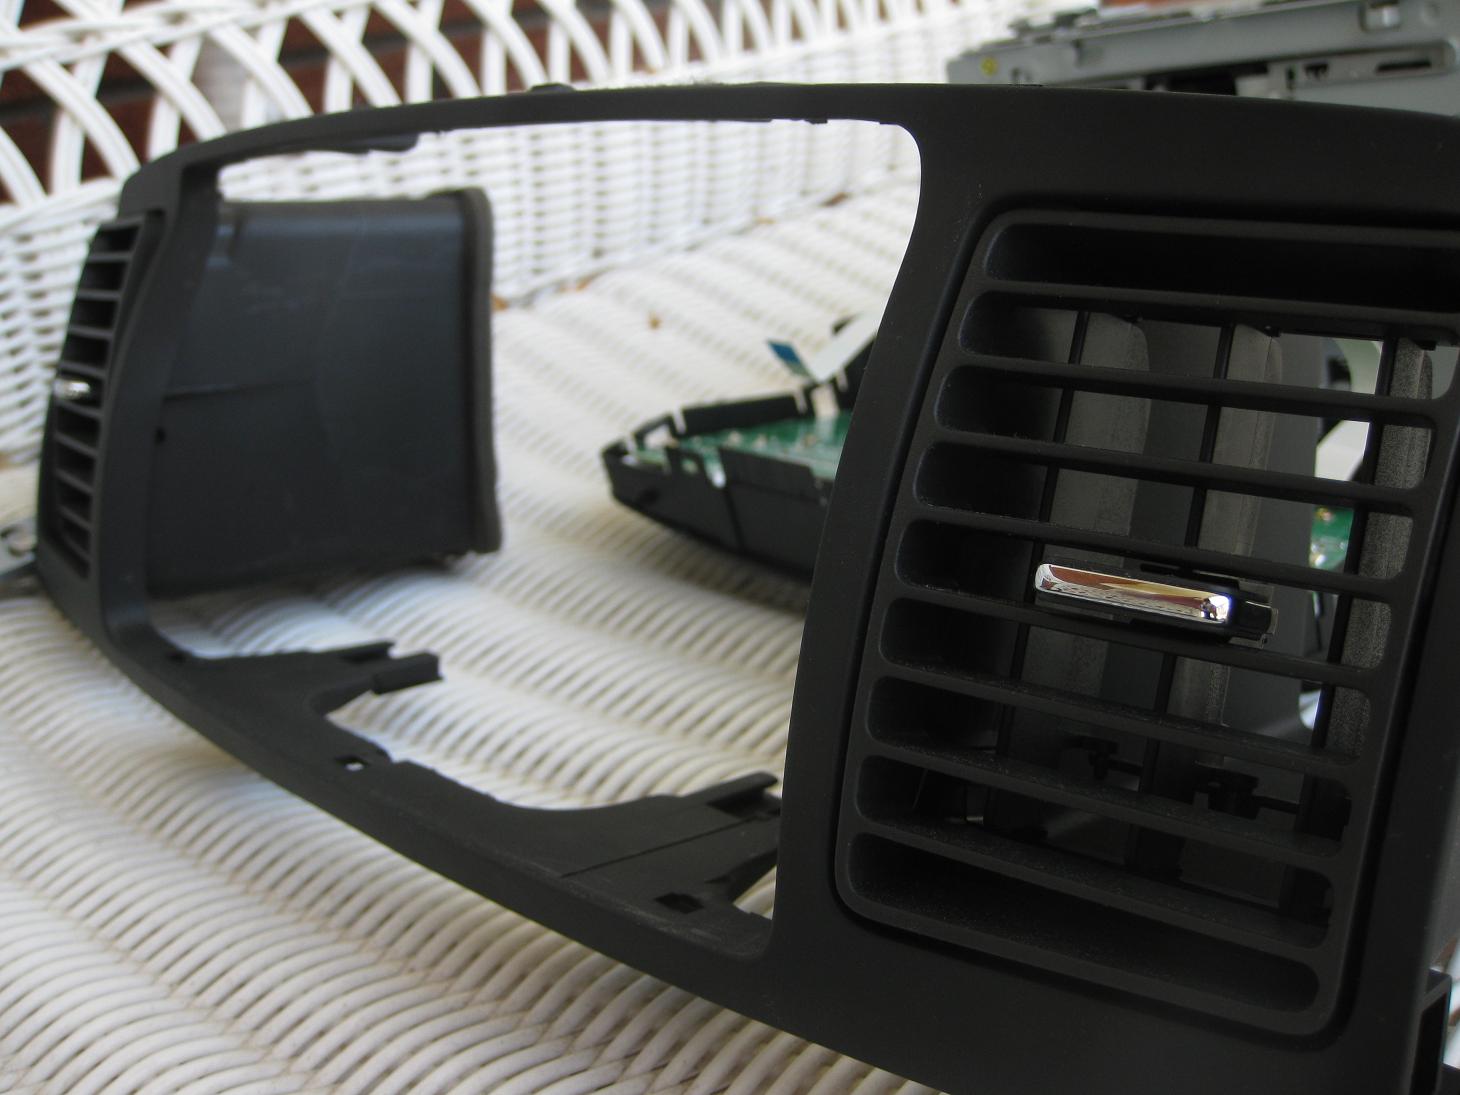
Wedge paint scraper at the top corners to undo clips. The entire apparatus (stereo and vent assembly) will require some force to remove. - Unplug the stereo hook-ups in the back.
There are three, including the antennae. - Detach vent assembly from stereo.
- Start with the top right clip, then top left, then the bottom clips. Force required.
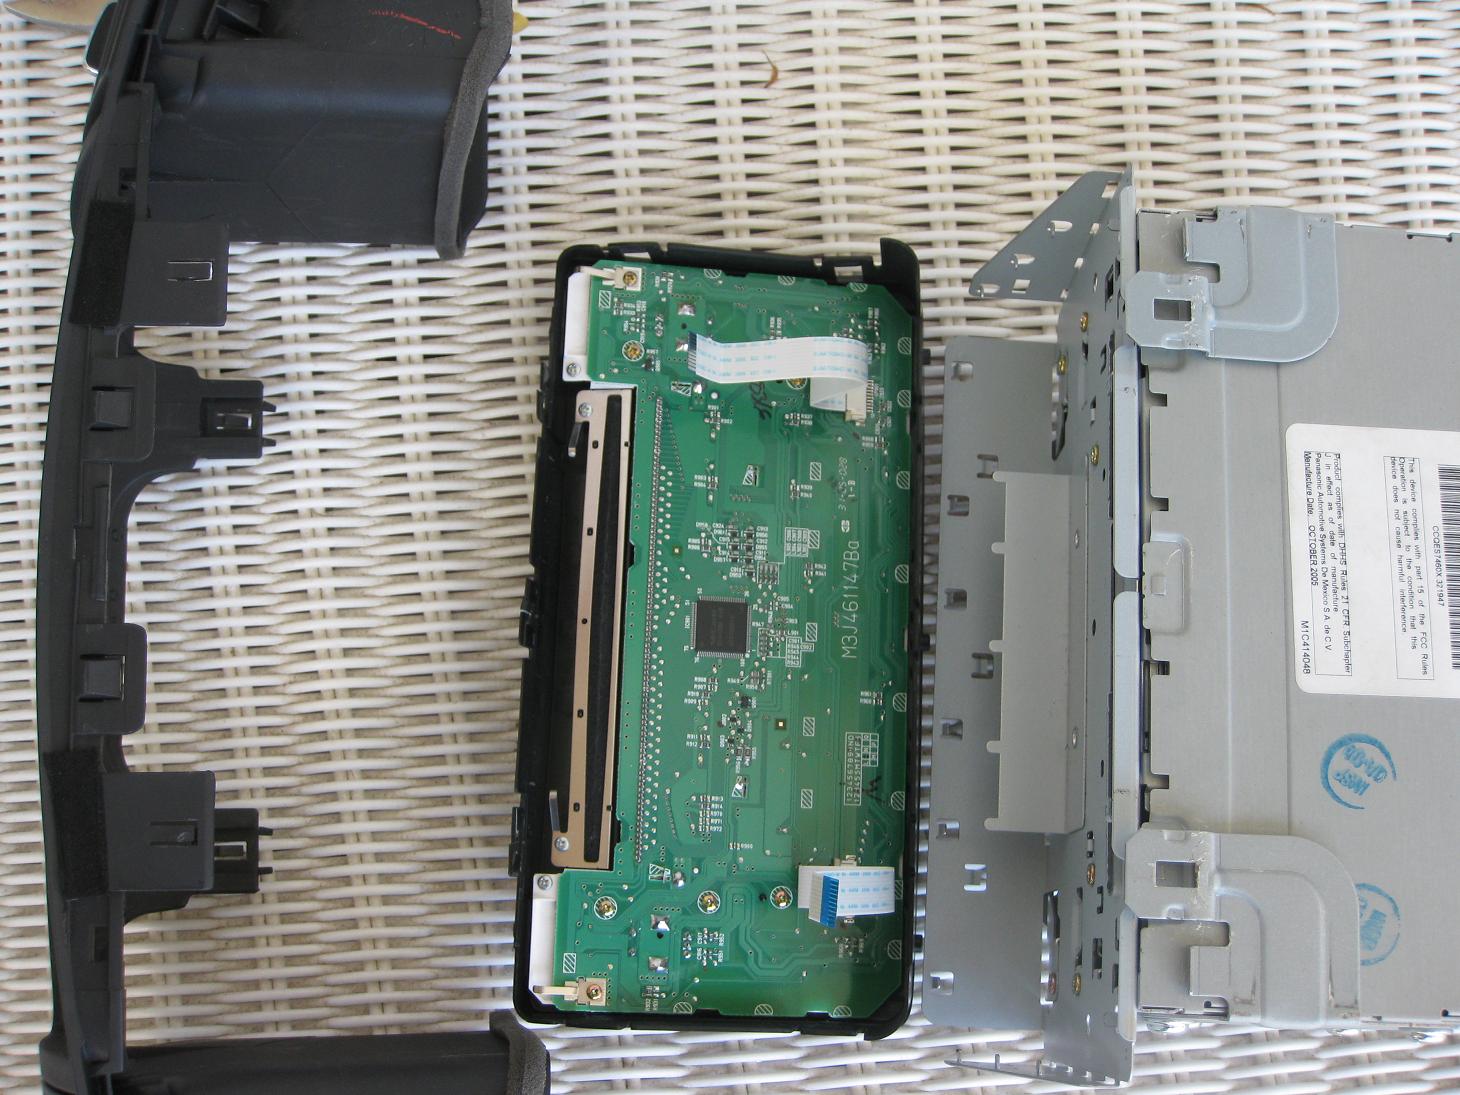
Stereo Modification - Pop off face plate.
Again, starting at the top right clip, top left, then the bottom clips. There are two ribbons connecting the face plate to the stereo; detach slowly to prevent ripping. - Remove side brackets.
The screws are thread-locked, and will require force to “break” before unscrewing. - Unscrew the front, top, sides of the stereo casing.
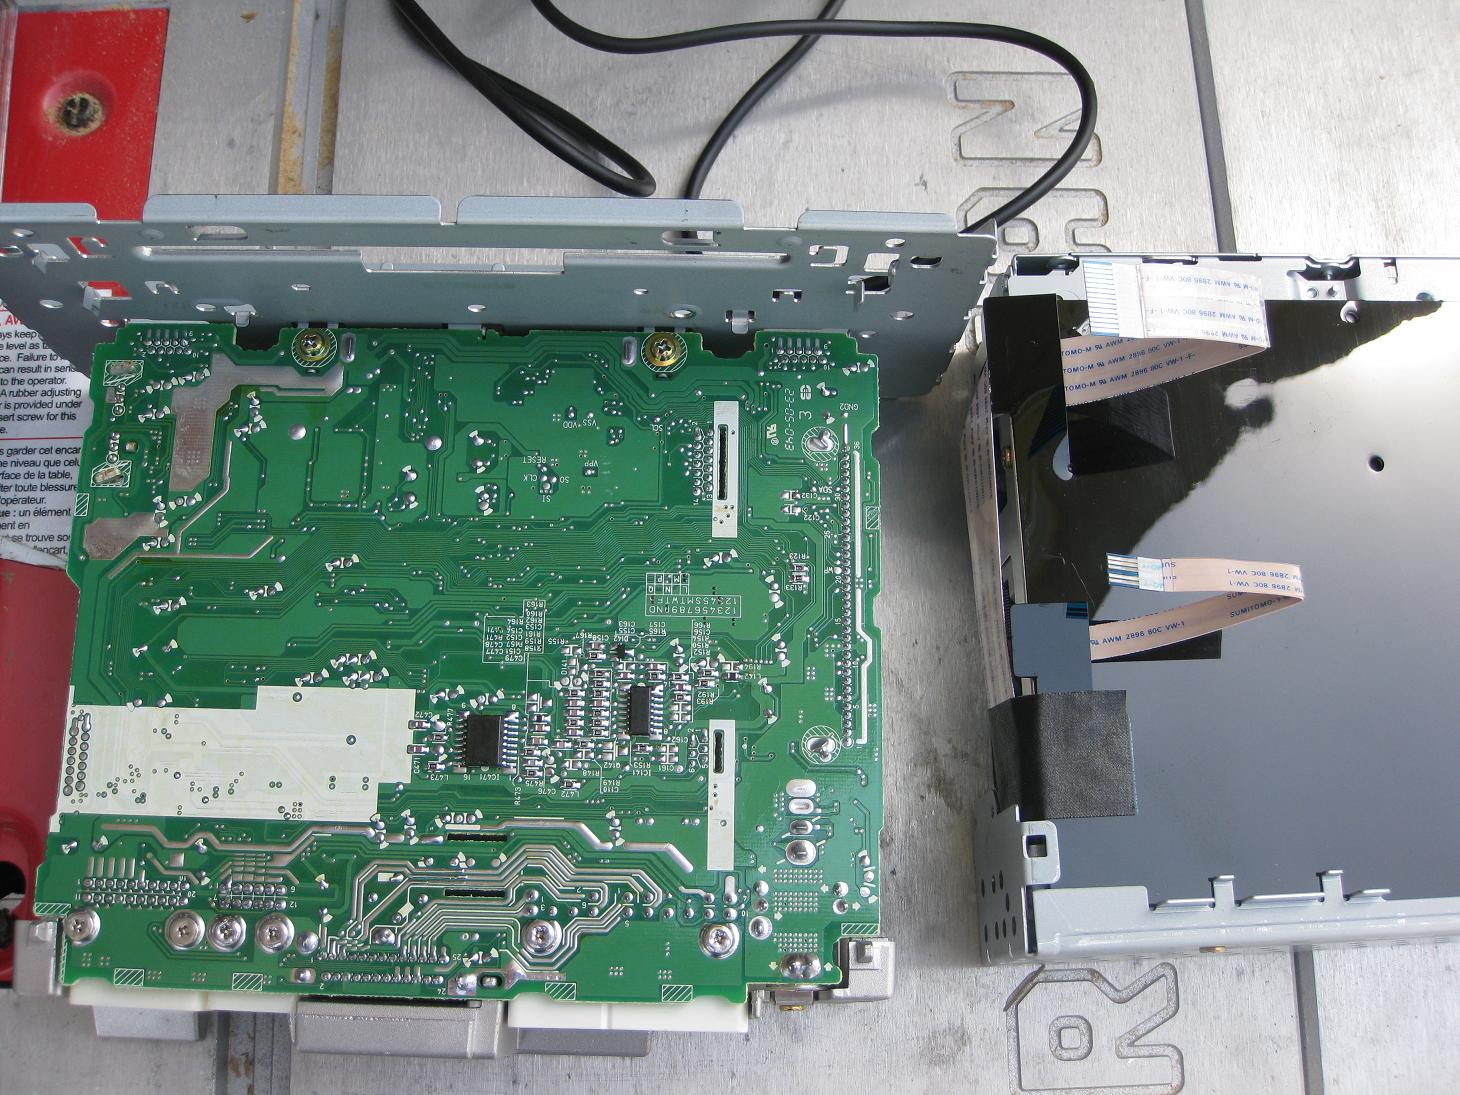
Start with the front, top, then the sides. Collect all screws in a zip-lock bag. Unscrewing the back of the casing is unnecessary, though there is one screw per side holding the sides to the back. - Lift CD changer off the stereo circuit board.
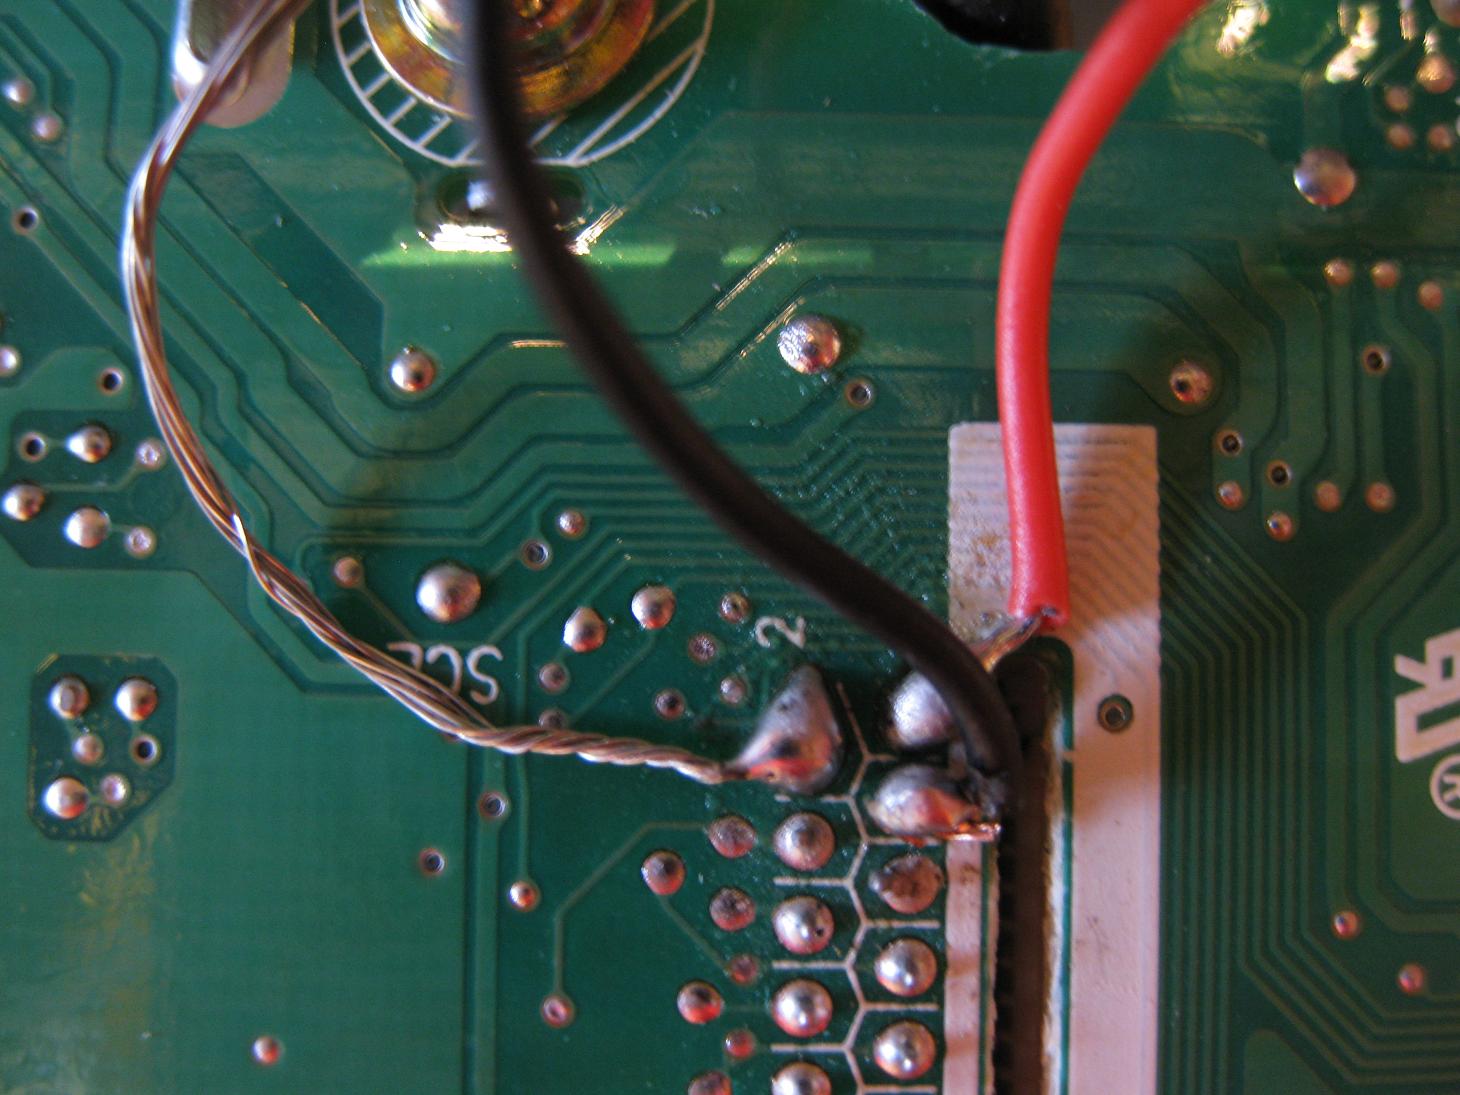
Two ribbons connect the CD changer to the stereo; carefully disconnect. Soldering occurs at the pins of the larger ribbon cable, as indicated in the picture below.
- Disconnect four cables hooked up to the A/C console.

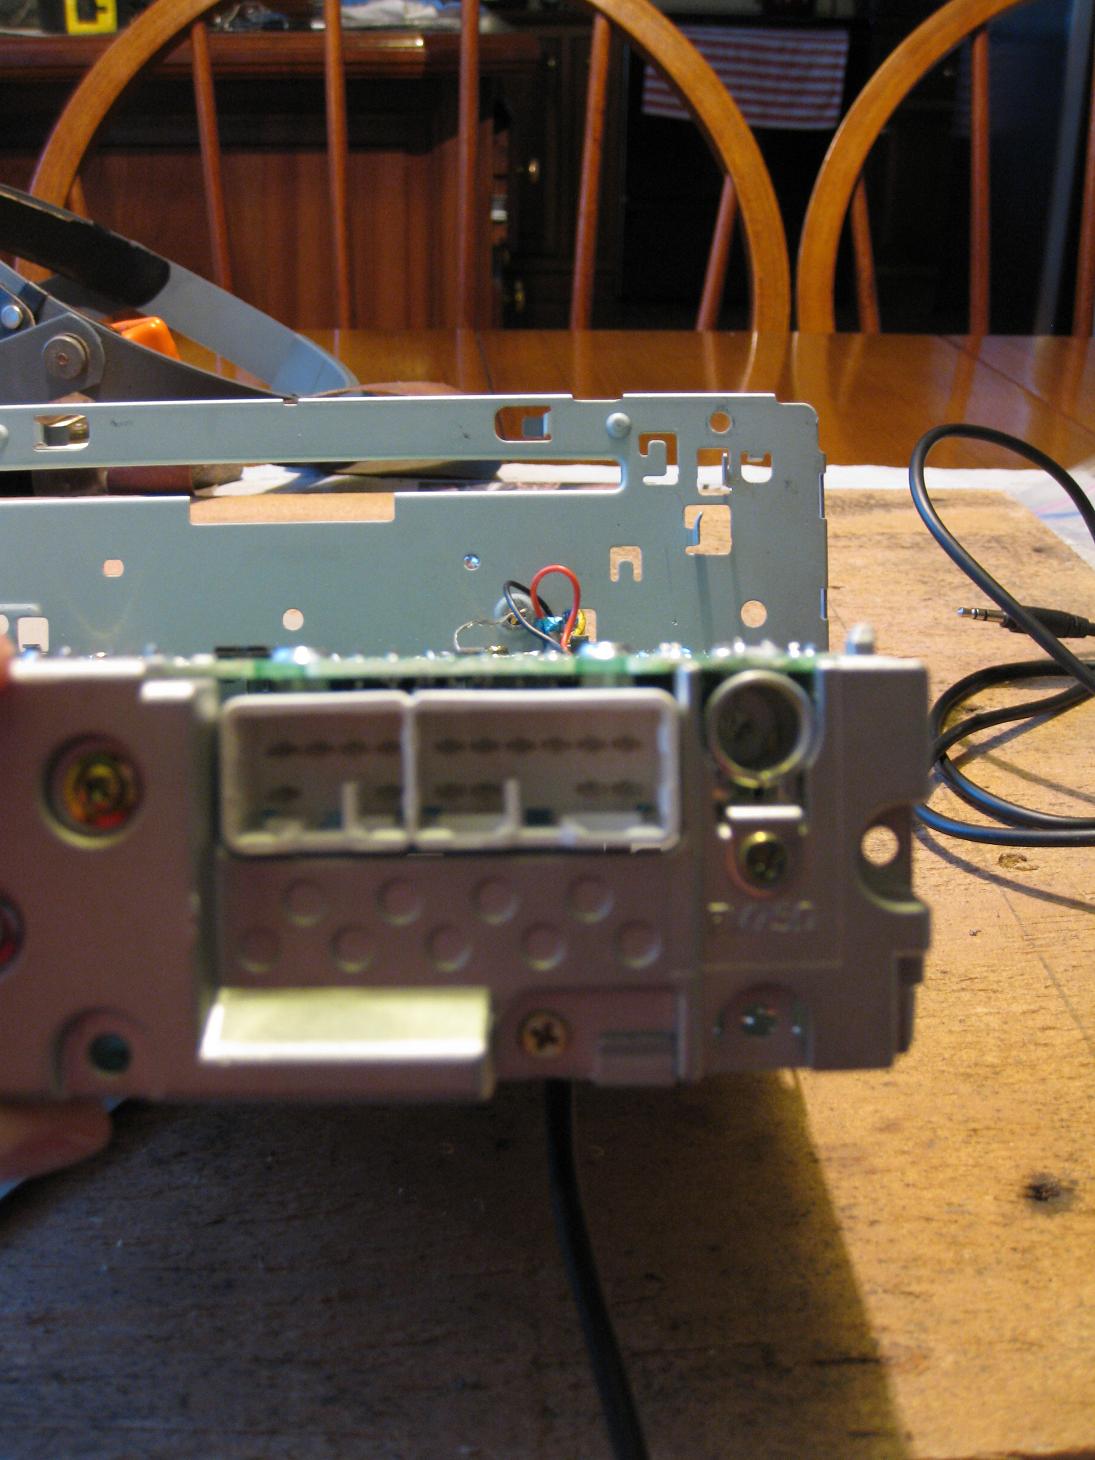
- Position the extension cable.
The extension cable snakes out the back of the stereo, to feed into one of the change holders, which allows the iPod to be neatly tucked away. To execute, feed the extension cable from the bottom, through a cooling hole, then back up through a space between the circuit board and the casing.
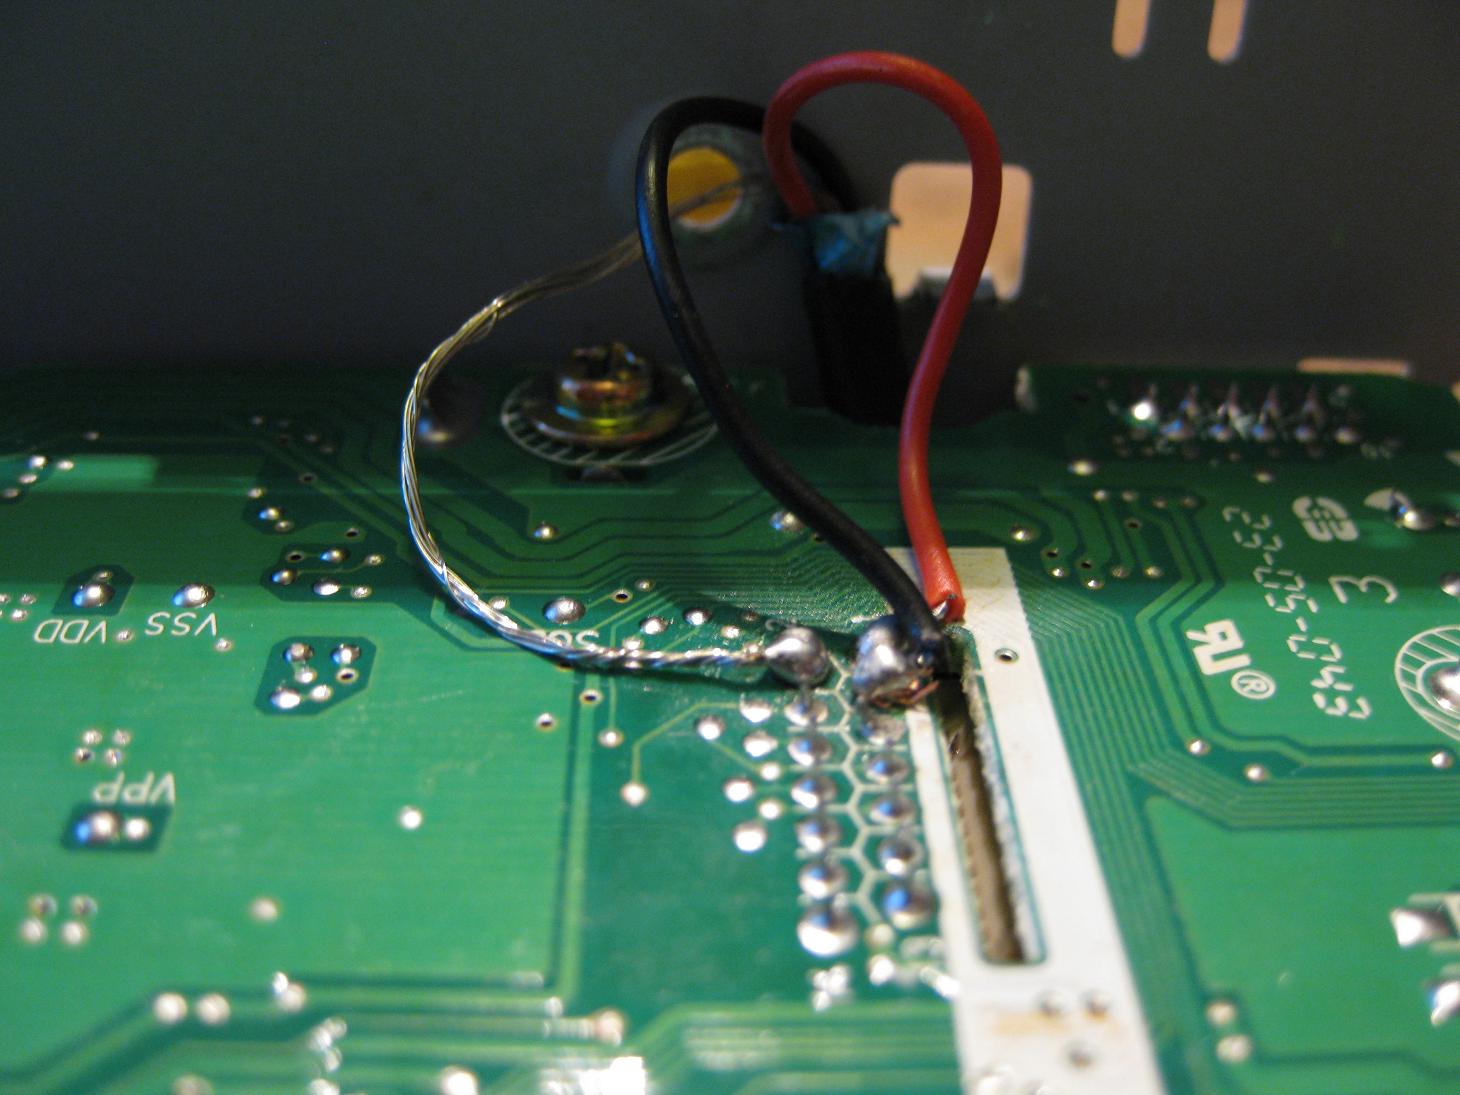
- Solder.
On the cable: Red – Right Speaker
Black – Left Speaker
Gray – Ground
On the pin set:
P1 – Right Speaker
P2 – Ground
P3 – Left Speaker
Keep wires clear of where the ribbon cable plugs in. - Secure head phone extension wire.
Use hot glue, tape, or a twisty wire. Secure the wire along the bottom of the casing, where the wire was initially fed. Securing the wire shifts point of greatest tension from the soldering to the wire itself.
Reassembly
- Connect ribbon cables, place CD changer back on top of the stereo circuit board.
- Screw back side plates, top plate, front plate, and replace the front screws.
- Reattach brackets.
- Reconnect front plate, re-clip vent assembly.
- Feed the new “Aux Cable” into the back, down to the hole in the change holder.
- Reconnect the three stereo connections, slide the stereo back into place.
- Screw in the four bolts. Snap the A/C console back in place. Screw in the screw from the fan control, and plug the knob back in. Snap the shifter base back in place.
- Reconnect the battery.
- Plug in the iPod.
Run the CD player. The connection should override any CD that’s playing, although creating a silent CD is a better option.

To download a .pdf version of this guide, right-click here, and Save As.
UPDATE: 10.12.21
Drew Darrow completed this hack on a 2006 Corolla, non-sport, with a CD player, not a CD changer.
Below is his “graphicized” image of the circuit board, identifying Pins 1, 2, and 3 for both CD player and CD Changer.

Thanks Drew!
John Kelly successfully completed the hack on a ’05 and an ’07 Corolla. The end results are below:


Thanks John!
Blake’s successful iPod auxillary hack below:
79 Comments
nice – heard jimmy d was involved with this somehow?
Great article but I can still hear the suppressed sound from disk. Any idea why is that? Also, I am not sure how to write a silent CD
If everything was soldered correctly, you shouldn’t pick up any of the suppressed sound. Try making the silent CD – I updated the post with a link to directions on how to create one. Hope it works, let me know if it doesn’t.
Just did this on my 07 corolla and it worked perfectly. Thanks for the guide.
If anybody does this remember not to solder the wires too vertical, they need to lay down flat near the board or the CD player will put a lot of pressure on the joints.
If I do this, does that mean I can’t listen to CDs anymore?
You can still listen to CD’s. The way this aux hook-up works, it only overrides sound from the CD player when an mp3 player is hooked up. If nothing’s there, then the CD will play normally.
Just did this to our 2006 Corolla, and it works great. Thanks!
Hey Chris! Thanks for this post!
Hey my fiancée has a 2006 Corolla (not sport) and only had a single CD changer. The ribbon cable (only one, not two) going from the cd drive to the motherboard you mentioned plugs into on on the side, not the one you pictured. However, I took the “P1, P2, P3” info you provided and applied it to the identical pins at the place where the single disc drive DOES connect. IT WORKS FLAWLESSLY! You can still do this hack even on a single CD player!
(I can take pictures for this post if needed)
Hey Drew – I’m glad the hack worked for your fiancee’s Corolla, and that the guide helped. It’d be fantastic if you had pictures — I’ll hit you up about details.
I’m a 20 year old girl and successfully did this in my ’05 corolla!! so proud of myself! it was my first time soldering too, took me an hour to melt the thing right ! Kinda left lots of scratches on the panel from putting back the stereo inside though, so be careful!..but mehhh, dealing with music in your car with an ipod is 100x easier than with CD player, who even still uses a CD player? anyway, thank you for the super detailed instructions Ming! Happy New Year!
Hey Rochelle – glad everything worked out! I’d love to post a picture of your finished product, so feel free to e-mail me a photo if you get a minute. Hope you had a great new year.
what aux cable did you buy and what brand because i had one laying around but it only had two wires not three.
Martin – take a look at the top of the instructions. It’s not an aux cable — it’s a headphone extension cord. Picked it up at Radio Shack for nine bucks. Good luck with the mod.
Thanks for the instructions worked great. No issues!
You’re welcome Scott, glad it turned out well.
Can the ipod be hooked up to the aux cable and a Car Cigarette Charger st the same time? Has it stopped working for any of you?
Thanks.
Hey Sergio –
I did hook it up to the charger at the same time while I was moving to California, never had a problem. Best of luck.
hi i did every thing according to the instruction, but for some reason only the right speakers work. any idea how to fix it?
Wow great article. I saw the instructables and the ehow. But this is exactly what i needed. 1 is right 2 is ground 3 is left. Just what i needed! YOU ROCK! Now to find myself a headphone extension to strip/solder.
Hey Jeff glad it helped man. You should be able to hit up Radio Shack or whatever to find one. When you get it done, feel free to send me a picture to post of what the finished job looks like.
Problem! So is there a difference if i bought and aux cable or a headphone extension? Cause I soldered on the aux cable last night to my A51814 red(right) on 1, ground on 2, and white(left) on 3. Tried playing something couldnt hear anything. =/ wrong pins? wrong cable? bad soldering job?
Hey Jeff — never tried it with an aux cable so I couldn’t ID the problem. I would pick up the headphone extension and give that a shot.
I have this 6-disc changer and it is displaying “Error 3” which I know is unfixable from previous experience. It is still under warranty but I am not really interested in replacing it because this is the fourth (!!) cd player of this SAME model that has broken on me since 2006. I hate this cd player and my dealership. My question is this: do you have any idea if this “error 3” will cause me any problems with the functionality of this procedure? Thanks in advance.
Hey Roger — no idea man never even heard of “error 3” until you brought it up.
If anyone else knows anything about the “error 3” issue, please feel free to comment about it here.
Im such an idiot! i bought a mono extension not stereo! fml! well hope others learn from my mistake! haha it worked perfectly! <3 you chris!
haha glad it worked out Jeff. Best of luck.
How do you break the thread lock screws?
Force.
Worked great on my 2006 Corolla (6 disc changer). This is my first solder project so I ran into some trouble getting both L/R audio to work, but on the third time it sounded great. Thanks for the detailed steps and for taking the time to create the post. Saved me over $150 dollars, which is what Best Buy wanted to do essentially the same thing.
Hi Greg I’m glad it worked out with the soldering and the thread locked screws! Enjoy.
Kinda scared to do this.. i was hoping if anyone can help me find a video tutorial on this instead.. and do i really have to do the first part about the battery thing? Mine is also a corolla 2006 but its automatic.. thanks
Hi Patricia — if there is a video tutorial I haven’t seen it yet. As far as I know, this is the best tutorial out there on this particular mod — don’t take my word for it, check out comments above or do a google search. Yes, do the battery thing, it’s a precaution that’ll take you five seconds. If you try the mod, please let me know how it goes. Good luck.
I tried it today and failed.. It won’t change into my CD option anymore, and when I try to put in a CD it wills ay Error 3 and spit it back out.. Not sure what I did wrong. Since mine is a single cd player, I soldered it on the other side. Please help! Thanks
Most likely its the soldering job. Take a picture and post it so others can see what you did and perhaps help.
I finally found the solution.. Ask my boyfriend to help me.. LOL! it was the soldering job tho.. But yey!! its working now! Thanks! =)
Right… 90 percent of the time it’s the soldering job. Glad it worked out — did you take any photos or video?
I did actually. I just don’t know how to post it here. Idk if copy pasting the link here would work.
Oh wait. If you meant by picture of the soldering job I didn’t lol! Sorry misunderstood you.
Thanks very much! It worked! I have different variant although the stereo was the same. It started playing once I put in the silent CD.
Glad it worked out! Enjoy!
I followed this tutorial to the dot and now I’m having problems with the face plate display for the stereo. I think the ribbon cables connecting them may need to be replaced so I’m waiting on that to be delivered. Anybody have any other ideas why the face plate may not be working? All the wires are connected in the back of the cd changer properly and the yellow lights on the edges of the cd feeder did light up momentarily.
yeah the ribbon cable is the only cable connecting from face plate –> stereo correct? i would double check to make sure this connection is right.
I had the Error 3 problem myself with my 6-disc version. I took the radio apart again, made sure: 1. none of my wires were touching, 2. no solder points were touching, and 3. wrapped tape around exposed ends so nothing would connect with the metal of the disc changer when I put it back on top. Problem fixed! I’m not sure exactly whereand what the problem was, but it must have been a crossed wire or shielding issue causing Error 3.
glad it worked out!
Thank you so much for the instructions, it works perfectly. The only thing, does anyone have a problem when they charge their phone/ipod AND play the music? I get a lot of hissing and crackling. I got a ground loop isolator, incredible reviews on Amazon, and it only made it worse. Anyone have problems with this or suggestions?
yeah, i found there’s hissing noise when i use my charger as well. generally, i try not to charge while i’m running the ipod as it freaks me out a little. but nothing bad has resulted thus far.
Did you need a code are anything when you reconnected the radio or anything?
for what? no.
anyone know a good place to get replacement ribbon cables for the head unit => display. i broke mine and had just gotten it working 🙁
hey so I did this today and kind of failed horribly. I accidentally took apart the CD player instead of just taking it out. when I put it back together and did the soldering it will not switch to it and makes weird grinding noises.
did I not put it back together correctly or is this just the cause of a bad solder job. also does it matter if the ground is covered because it touches the metal and that might be messing it up.
any help would be appreciated I have a 05 corolla with a 6 CD changer.
morgan, i would try starting all over. take apart the soldering and get back to opening up the cd player. the cd player sounds like the problem.
why did you open cd player? i ask because i wonder if the instructions weren’t clear enough. if that’s the case, what are potential ways to add clarity so others don’t make the same mistake?
No it was all my doing, the instructions were very clear I just didn’t read them very well. I just assumed the soldering stuff was inside the CD player and went tith that. I think I’m going to try it out but in the meantime I think I blew a fuse that controls all the center console stuff and the overhead lights. God I need to not mess with my car
Hi, is there a possibility to rather install a usb cable for a memory stick?
Never have tried this actually, what purpose would it be for?
Hi, ipod’s are really expensive in South Africa, but usb sticks are cheap. Most of the people here use usb’s for their music pleasure. The 6 disk unit has broken down so I had to strip the whole cd unit to get the 6 cd’s out.
Now I need to have to listen to something else than the local radio stations.
Do you think it’ll work with a 2005 Matrix? The radios look similar, but not identical.
try doing a search for the mother board model number for the radio on the 2005 matrix. that’s what’s important.
Hmm, looks like your radio is model A51814 and mine is A51817. Well, it can’t be that different. I’ll open it up and see. How did you figure out which pin did what?
I googled around and managed to find a pin map for the board. Let me know what you manage to find.
I didn’t find anything, but I did take apart the radio. It looked identical to yours, so I soldered onto the same tree pins. It works perfectly now. Thanks!
Oh, I watched this video before removing my radio.
http://www.youtube.com/watch?v=mJ_US2DImH0
Also installed a female audio jack near the 12V outlet like the video showed.
Hey Ed, so glad it worked out! And thank you for the video share — between that and this tutorial, I think people have a pretty comprehensive guide to this mod. Pretty awesome (I just wish I had that video when I first did mine!)
Hey Chris, I am doing this mod with a single disk CD, but I cannot tell from the picture which pin is P1, P2 or P3 – it is too low resolution. Do you have a better picture of it? Thanks!
Hi Serge, I don’t unfortunately! That image was provided by Drew Darrow, who I believe used this guide to complete his project. I am pretty sure, however, that’s it’s pretty analogus to the 6-cd changer, so just double-check what I did for the 6-cd, and mirror it for the single. Hope that helps a little!
Hey Serge and Ming!
I don’t know how I sent a low-res version of that “graphicized” layout, sorry! But, for future readers and hackers:
If Front = Where CD Comes Out (Player AND Changer)
Then, From Front (Going Towards Back):
Pin 1
Pin 2
Pin 3
Blessings!
Hey all!
I just finished this same hack on a 2010 TOYOTA TACOMA as well!
Didn’t take any pictures, but the AUX cable went behind and to the driver’s side and I drilled a hole in the little change tray on the driver’s right, to the right of the steering column. This is more practical than the glovebox because most users will have an iPhone or Android phone and want access to it easily for a number of other purposes as well.
BUT NOT TEXTING AND DRIVING!
Blessings!
Drew! Awesome man thanks so much for both the update on the pin board and idea to drill in the change tray. That’s brilliant, not sure why I didn’t think of that when I first did this mod.
Thanks so much! Just completed this on a 2006 Corolla. Works great!
Yeeeeaeaaahhhhhh Peter! Good work man I’m happy it worked for ya!
Thanks for posting this Ming. I just finished doing this for my wife’s 06 Corolla as a Christmas gift and it works perfect with my droid and her I phone. However, for some reason when I hook up her Samsung Galaxy Note 3 the phone doesn’t register that I plugged in anything through the headphone jack. Do you have any idea why this would be? I’m going to try and download a different app to play music and maybe that will work? Well either way, the hack worked great with all my other devices so thanks again.
That’s really strange I’ve never heard of this before. I’ve managed to plug in ipods, iphones, kindles and ipads. Never tried a Samsung so couldn’t tell you either way, unfortunately. But I’m glad it worked for your other devices thus far! Thanks for leaving the comment!
Thank you for sharing this. I was able to follow all the instructions clearly and made this mod. Works very well.
Hey Keith, you’re welcome! I’m glad it worked out!
will this still allow for the cd to play?
Thank you so much for the pin layout. this really help.
very nice of you to share the knowledge
Thank you it work for Ipod, iphone but not for samsung S3 or note2.
If you plug in the S3 fisrt then turn on the ignition it will work but at the end of the song it will stop registed on the phone that the head phone is plug in.
I will try to down load other app to play music
I’m using the one that came with the S3 phone
Can you use a 4 wire earphone cable with this and howwill the wiring be? I just got a hold of a broken one. Thanks
I have a corolla S year is 07 it has the 6 cd changer. So does this mod remove the ability to play cd’s since there is an ERROR message when the stereo is in cd mode?
There shouldn’t be an error message. When mod’ed correctly, CDs will play just fine — the mp3 player will play “over” the CD.
Thanks for the excellent instructions. I just completed this successfully on a stereo model A51817 from a 2005 Toyota Matrix. Works great. I also added a 12v plug to the glovebox (where I also ran the input wire) and will add a Bluetooth receiver there. Will look (and be) seamless!